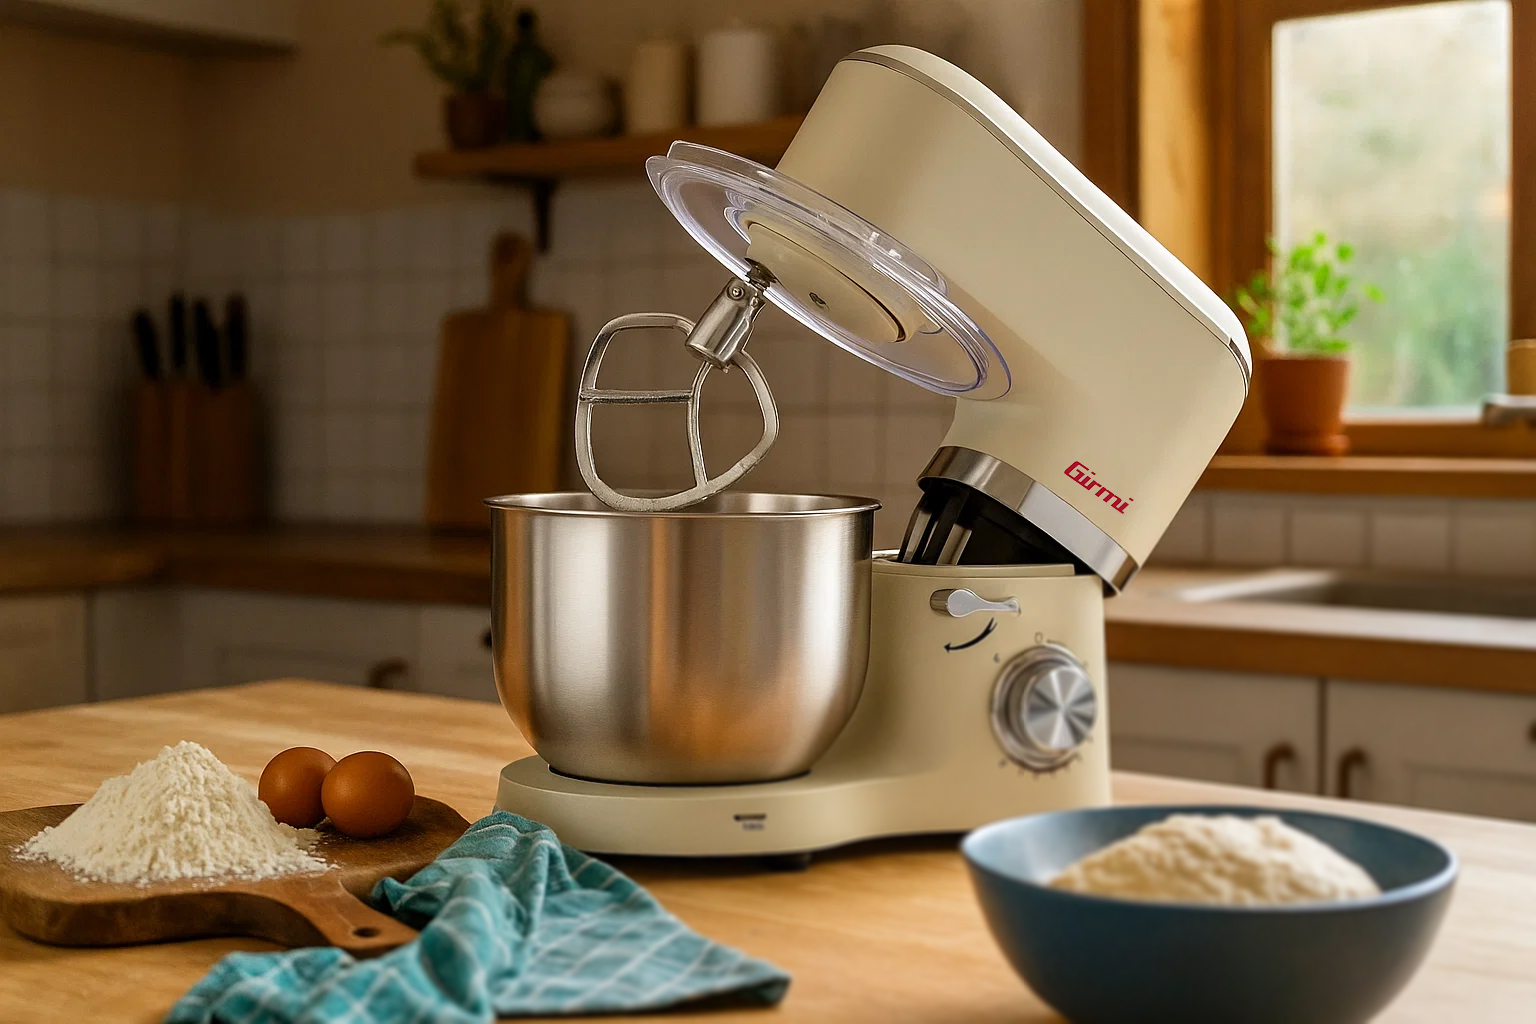
How to use the stand mixer: complete guide for bread, pizza and desserts
It used to be something only chefs and professional bakers in their labs had, but today you can find it in people's homes — those cosy places where you cook between a Zoom meeting and a pizza party with friends. And it's great to have one. Knowing how to use a stand mixer means one thing only: making life in the kitchen easier without compromising on taste, creativity, or the pleasure of doing things well.
Knead, whip and blend even the hardest doughs, such as those used for large quantities of leavened food, without aching arms or jumping hand blenders. The stand mixer has become an essential tool for anyone serious about cooking. Today, we will explain everything you need to know: how to choose the right model, which accessories to use, and tricks for achieving perfect dough every time, whether it's fragrant focaccia reminiscent of granny's home or your special lemon cake.
What is a stand mixer and what is it used for?
A stand mixer is a kitchen appliance that helps you work dough effortlessly and continuously. It not only kneads dough, but with the right accessories it can also whip cream, blend egg whites and mix soft compounds for desserts, pies and mousses. It does everything you would do by hand, but faster and without any errors.
It saves you from long, hard manual work, leaving you with the most enjoyable part: choosing the ingredients and smelling the aromas, looking at the dough which rises in front of you.
The difference with a common kneading machine
When we talk about home kneading machines, it can be confusing. Many people think that stand mixers and kneading machines are the same, but there are actually important differences, especially if you want to achieve well-made dough.
A stand mixer is an evolution of the traditional kneading machine: thanks to its typical “planetary” motion, where the whisk rotates on its own axis while moving around the edges of the bowl, it works the dough in a more homogeneous and effective way.
A traditional kneading machine, instead, often works only at the bottom or in the center of the bowl, which can leave parts of the dough not fully mixed. It’s fine for simple doughs, but if you want precision, versatility, and consistently reliable results, a stand mixer is the better choice.
And if you love making leavened recipes with large batches of dough, you will notice the difference from the very first time.
Why use a stand mixer in the kitchen: all the benefits
- It kneads for you: Handles even tough doughs or long recipes just like hand-kneading, but without the effort
- Consistent results every time: Mixes every ingredient evenly, with no lumps or dry spots
- Saves you time: While it’s working, you can focus on the next steps of your recipe
- Versatile: Kneads, whips, blends. From pizza dough to cake batter, it does it all
- Handles large quantities: Perfect for cooking for the whole family or for prepping large batches in advance to store
How to choose the right stand mixer for your kitchen
Choosing the right stand mixer means carefully reading the technical specifications and understanding which model best fits your cooking style. There are at least four key features to consider.
![]()
Motor Power
If you knead often, especially heavier doughs like bread, pizza, or brioche, you’ll need a strong motor. A good stand mixer for home use typically starts around 1000W, but for tougher doughs, it’s better to choose a more powerful motor. The GIRMI IM47, for example, reaches 1500W, while the IM50 goes up to 2200W. These models are perfect for high-hydration doughs or large batches, without the risk of overheating or straining the motor.
![]()
Bowl Capacity
Capacity matters. A bowl of 6 liters or more allows you to work with doughs using 1–2 kg of flour at a time. It’s perfect if you cook for your family, want to prepare batches to freeze, or love organizing dinners with friends.
![]()
Materials and Stability
Your stand mixer needs to stay stable, even when working with tough doughs. Choose a sturdy model made with durable materials and a metal body, like the Gastronomo models by Girmi.
![]()
Included Accessories
A wire whisk, kneading hook, and flat beater are essential accessories. Some models also come with a splash guard or optional extra attachments. For example, the Gastronomo Plus IM50 can be customized with accessories for chopping meat, rolling out dough, or making tagliatelle and spaghetti. The more options you have, the better your stand mixer can adapt to your recipes.
How to use better the stand mixer: tricks and secrets
If you want to use the stand mixer, it’s not enough pushing a magic button: it’s a powerful appliance, and like all tools, it must be used judiciously. Here’s some practical tips to take advantage of it and use it smartly.
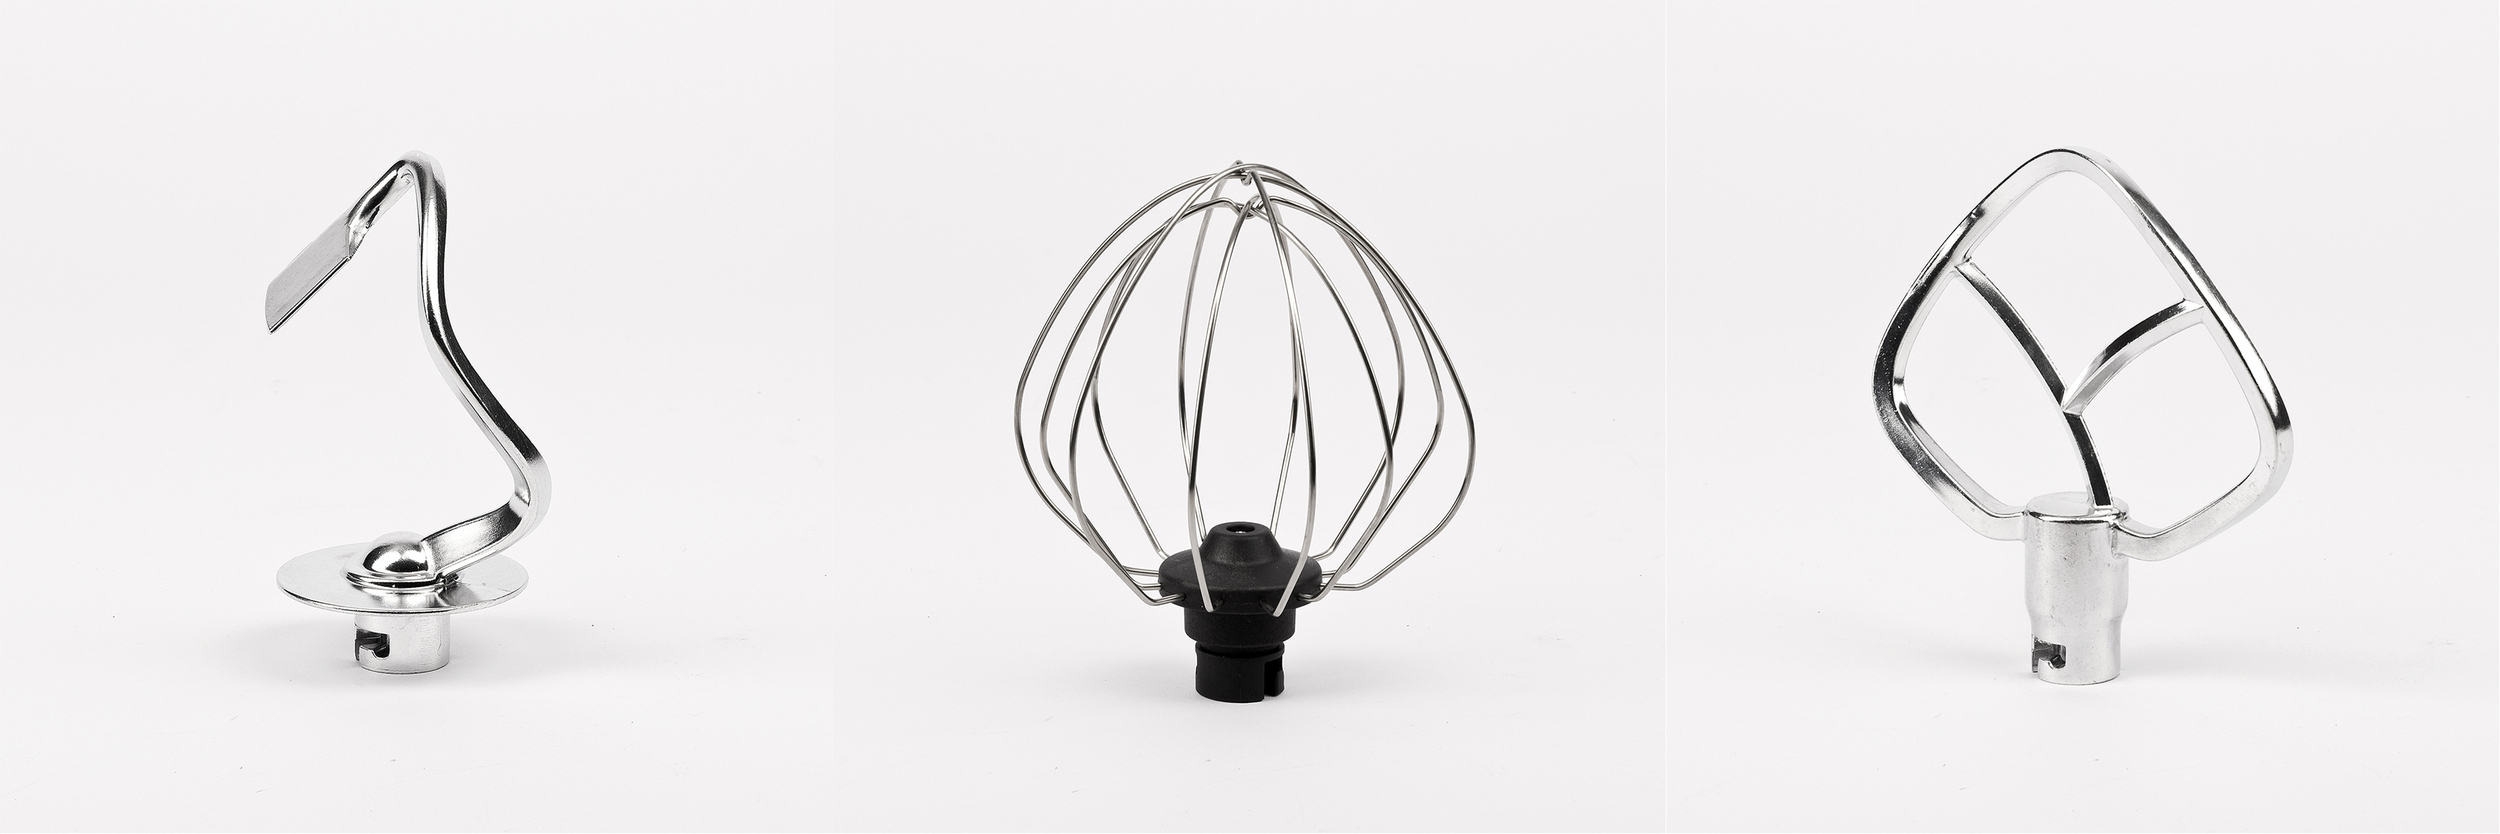
Accessories make the difference
One of the real strengths of a stand mixer lies in its accessories. Each tool has a specific function, and knowing which to use—and when—can completely change your results. Not all stand mixer whisks are the same: there’s the kneading hook for bread and pizza, the flat beater for mixing softer doughs like cake batters, and the wire whisk for whipping cream or egg whites. Learning how to use these stand mixer accessories will help you work better.
Using the kneading hook for pizza dough: how to get perfectly leavened dough
To make pizza, use the kneading hook and add 300 g of flour to the bowl, forming a well in the center. Dissolve 15 g of fresh yeast in half a glass of lukewarm water and pour it into the well. Start the stand mixer on low speed, and once the dough begins to come together, add a pinch of salt. Continue mixing at speed 2 until the dough detaches from the sides of the bowl and wraps around the hook — this means it has developed the right elasticity. Let it rest, covered, for about 2 hours. Once it has doubled in size, you can use it immediately or store it in the refrigerator. If you unfreeze the dough, knead it again with a little oil before rolling it out.
Tips and secrets for perfect dough every time
Using a stand mixer well is partly technical, but also about small details that make a difference.
![]()
Use the right speed
Always start kneading at the lowest speed, then increase to medium speed for a maximum of 2–3 minutes. High speeds should only be used for whipping cream, egg whites, and soft batters.
![]()
Follow the correct order of ingredients
Start by adding the flour and yeast to the bowl, then gradually pour in the water. Only once the dough begins to come together should you add the salt and fats. This allows the gluten to develop properly and ensures your dough rises correctly.
![]()
Keep time and quantities under control
With a stand mixer, 2–3 minutes at medium speed are enough to achieve a good dough. Never fill the bowl more than two-thirds full, and always use ingredients at room temperature to help the dough rise properly.
How to Know When the Dough Is Ready: Your dough is well kneaded when it is elastic, smooth, and wraps around the hook while detaching from the sides of the bowl, forming a kind of resistant “windowpane” effect. If the dough is struggling to reach this stage, stop, let it rest, and then resume kneading. Achieving the right balance between strength, time, and properly measured ingredients is key to perfect dough.
How to clean and maintain your stand mixer
A well-maintained stand mixer will last longer and perform better. After each use, always unplug the appliance before cleaning. Never immerse the motor body in water; simply wipe it with a damp cloth and a mild detergent to remove any food residues and splatters. Avoid abrasive cleaners and take care not to let water enter any openings.
Accessories, the lid, and the bowl should be washed by hand using a soft sponge and dish soap. Do not use the dishwasher: high temperatures and aggressive detergents can damage aluminum parts. After washing, dry all parts thoroughly before reassembling.
Knead with Girmi, unleash your creativity
Your stand mixer is more than just an appliance; it’s an invitation to experience your kitchen with greater freedom, flavour, and passion. With Girmi, every dough becomes an opportunity to create something delicious, even when you are short on time.